
Tracing Neurons using FIJI (ImageJ)

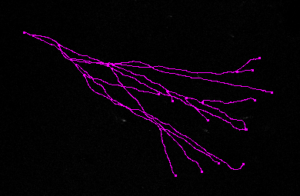
This post will show you how you can get one of these (dendrite tracing) using FIJI: a how-to FIJI on neuron tracing
CONFOCAL IMAGING
The image files used in this tutorial were taken using a Leica confocal microscope (model SP8). Using fluorescent imaging technique (*) and an extra spatial filter, this confocal can selectively collect light at a specific z-plane, filtering out any out-of-focus illumination. A series of clear 2D images can then be taken across the z plane. If the 2-dimensional slices are made of the x and y planes, the thickness that is available as a third-dimension is the z plane. With this, the series of 2D photos can be combined, allowing for reconstruction and 3D visualization and analyses of the specimen in question.
When tracing neurons imaged using a confocal, it helps to keep the z plane and the overall 3D shape in mind as it could interfere with some measurements like overall dendritic length. For example, sometimes branches that are part of the neuron are cut off the slice. With a 2D view, this could just seem like a shorter branch, but looking at the 3D view, if the branch ends at the edge of the z plane, it’s possible that the branch is actually longer but was just included in a different section of tissue.
DETAILS ON THE SAMPLE NEURON IMAGES USED IN THIS TUTORIAL
The sample images I’m using in this mini tracing tutorial were of tissue sectioned into 100um-thick slices, (mounted, and tagged) in which DNA was labelled with DAPI (405nm), and we had stained for the immediate early gene (IEG) zif268 (Alexa 647), and retrovirally GFP-labelled cells (Alexa 488). Because these fluorophores are excited by different wavelengths, the image files contain 3 different channels: one for each laser used: 405nm, 647nm, and 488nm, respectively. Tracings are made from the GFP signal.
(*) BRIEF BACKGROUND ON FLUORESCENT TECHNIQUE
Confocal microscopy is a type of fluorescent microscopy. Fluorescent technique involves the tagging of desired targets with fluorophores and the excitation of those fluorophores using light. Once excited, the fluorophores absorb some and release some energy, causing them to emit waves of a different length (emitted waves are longer than the waves used to excite them, due to energy loss). You can then see these emissions and take pictures of them using the confocal.
 F.I.J.I. Is Just ImageJ!DOWNLOAD AND INSTALLDOWNLOAD:link: http://imagej.net/Fiji/DownloadsDownload the appropriate version for your systemINSTALL:MAC USERS: Click on the downloaded file.You should be presented with this:
 Follow the instructions: drag the FIJI logo into the applications folder. Your applications folder should open up right after, and you should be able to find the FIJI app ready to go.PC USERS:Look for your downloaded zip file called “Fiji.app” and click on it (oftentimes internet downloads go directly into the downloads folder). Double-click on “ImageJ” (File Type = Application)Expand all contents. Shortly after, an expanded version of the “Fiji.app” folder.STARTING WITH FIJIFOR MAC: Click on
 ![]() FIJI the application (which should be in your applications folder by now)FOR PC: Look for “Image J-win64” (file type: application) in your “Fiji.app” folder. CLICK!Open file: by dragging and dropping it into the the bottom layer of the application
FIJI the application (which should be in your applications folder by now)FOR PC: Look for “Image J-win64” (file type: application) in your “Fiji.app” folder. CLICK!Open file: by dragging and dropping it into the the bottom layer of the application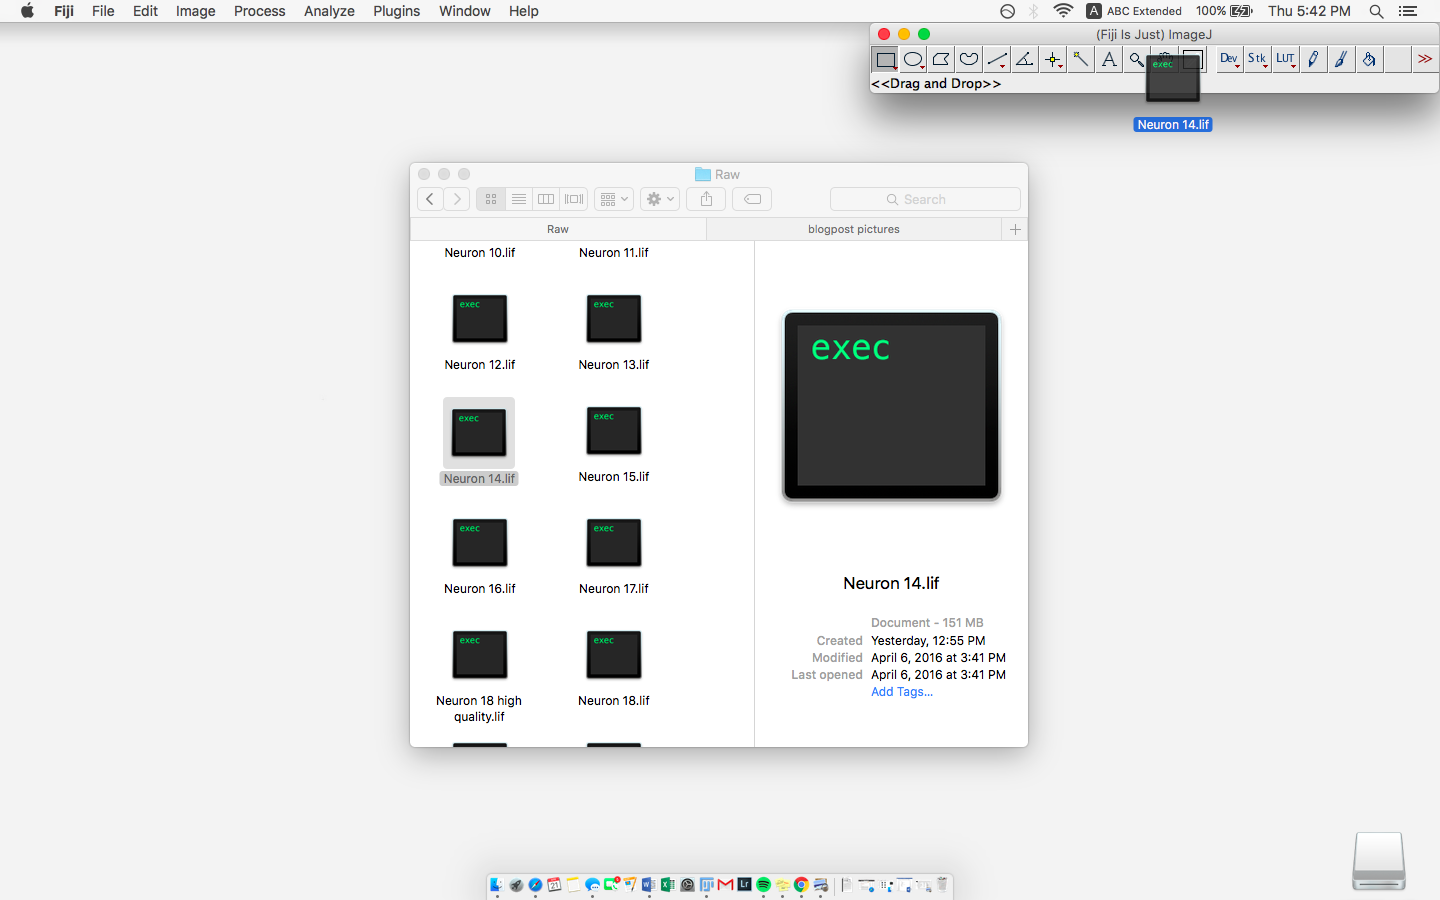 *note: pictures from now on will be more Mac-friendly because I myself use a Mac. But I did try the program on a PC and they work pretty much the same way. Where I don’t mention a Mac vs PC distinction, assume everything is the same (ignoring the slight differences in aesthetics).** also note: you can click on the images to enlarge them and view them betterNext, you will be met with this pop-up:
 Hyperstack viewing is sufficient. Leave all other fields unmarked. If there are pre-existing check marks in them, just go ahead and uncheck them. (Unless you’re pro at this and know what those other things do and you totally know what you’re doing – in which case, I’m not sure why you’re reading this)If, like mine, your images were taken with multiple channels, you’d have separate the channels first, in order to use the ImageJ plug-in we use for tracing.To separate channels:
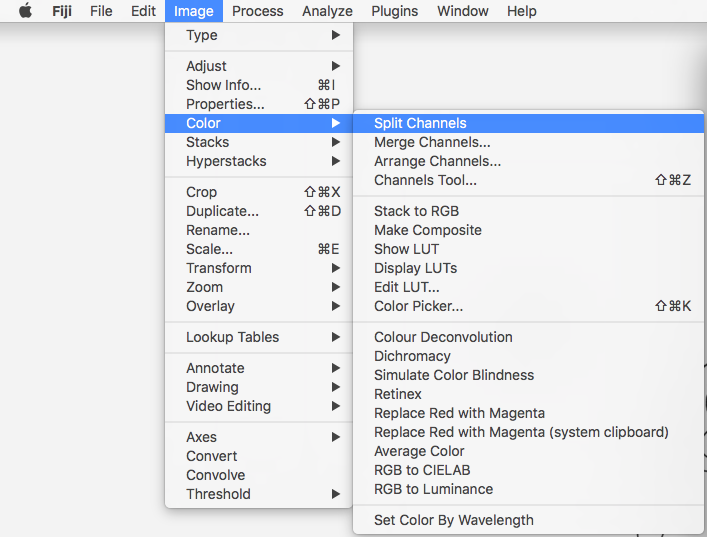 PC USERS: Slight aesthetic differences between macs and PCs. These “File”, “Edit” etc tabs will be on your Fiji app window, like so:
 But same procedure: Image > Color > Split ChannelsGet rid of the other channel windows ❌Simple Neurite Tracer Plugin:If you were wondering why I linked the download to FIJI instead of ImageJ, it’s because FIJI comes with a very useful plugin called “Simple Neurite Tracer” (and FIJI is just ImageJ – but a more updated version).
 Console window isn’t needed: ❌To create new 3D viewer or to not create a 3D viewer, that is the question. You’ll have to decide for yourself! Check out the 3D debate section below.
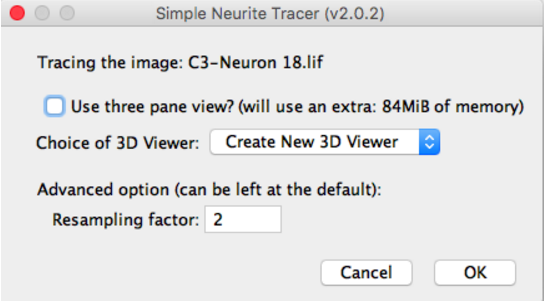
TRACING WITH FIJI’S SIMPLE NEURITE TRACERFamiliarize yourself with the file. You can always see the x and y plane because it’s what you have on your 2D screen. What you are moving through when you scroll is the z plane (like a digital flipbook! Or I guess, videos with less impressive frames/sec).If you think about the overall 3D images and keep in mind that as you scroll, you are flipping through a series of images differing in z coordinates, you can imagine that the “longer” illuminated lines (in my case, these “illuminated lines” are dendrites) in one frame must appear so because you are viewing them at the same time – meaning they are on the same image – meaning they are on the same z plane / have the same z coordinate.On the other hand, the “shorter” illuminated points that need scrolling through in order for you to connect them just means the dendrite is running along through different z-planes.Locate starting point.Where you start depends on what you’re looking at/for. I was hoping to get dendritic information, so I was tracing dendrites. And so that’s what I’m going to be talking about. I imagine this is still useful because you can still use this as an outline and just make adjustments to suit your specific needs. Right, dendrites. SO, I scrolled through the z plane to find a clear picture where I can see the soma and where the dendritic branch starts. Then CLICK. See where the blue dot is?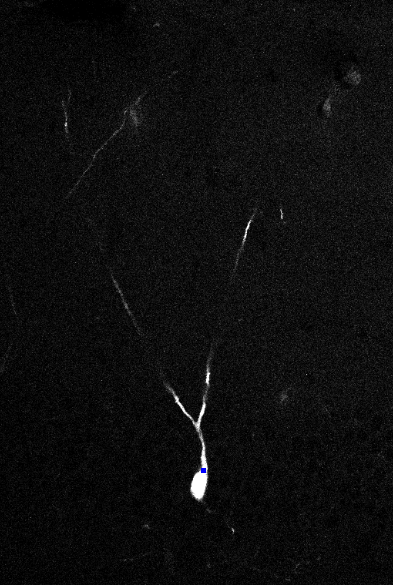 *NOTE: Simple Neurite Tracer is like a connect-the-dots software. If you click at two points in your file, it will attempt to “search” for the path between the two dots. So try not to click too much. If you’re finding that it’s not working for you properly, first check that it isn’t searching for a non-existent path. If it is, click “Abandon search” to move on. Your Simple Neurite Tracer windows would look like these:
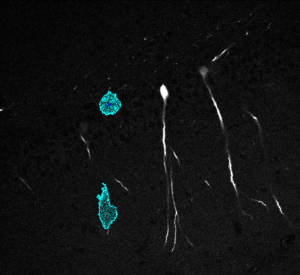
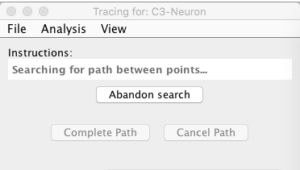 Left: path searchers in blue; Right: click Abandon Search to move on.Find the next branch point and click on it:
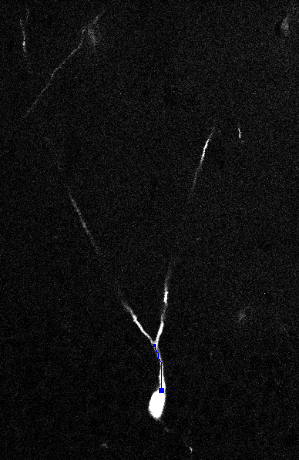 Keep path segmentIf you traced a long line, scroll through to make sure that the pathway actually follows through the dendrite line you see. When you click two points with the tracer like this, the program scans for the shortest “bright” path between the two points. Sometimes, this means jumping in between dendrites, especially if there is a lot of overlap in your sample. So it’s good to double check before moving on.If all is clear, click “yes” in your plug-in window (or press “y”):
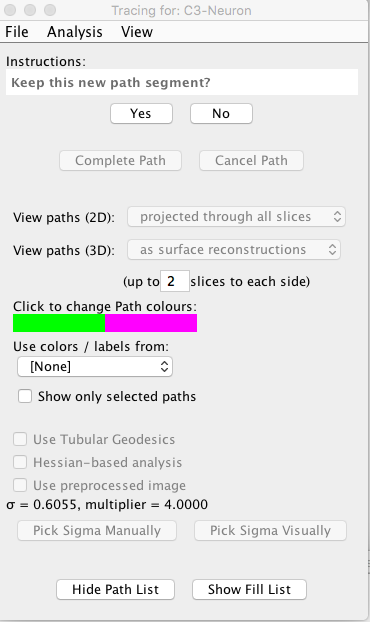 If you realize you made a mistake accepting this segment, no worries, you can always click “cancel path” on the same plug-in window.Now, what if your branch point was super far away (unlikely for your first branch point, but it could happen for later branches)? If it is so far that the tracer is having problems finding a pathway, you can trace smaller segments. Create a segment for a section that you are sure of, to minimize crossing over and tracing different paths. Once you keep a segment, it stays (but it’s reversible), but you can still add on it as long as the path isn’t considered “completed.” (A completed segment does not equal a completed path). At this point, if you click at another point in your image, the program will attempt to connect that point to your existing segment.
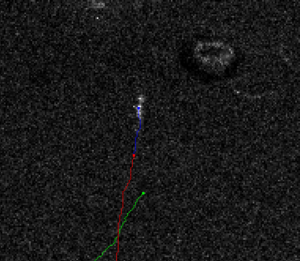
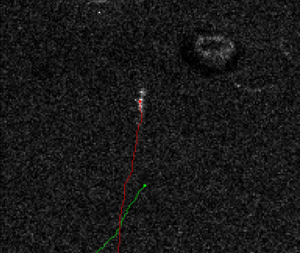 Left: The red line represents a completed segment. Clicking on another point results in the blue line. Accepting the new segment adds it on the previously-completed segment that is not a completed path (see image on the right). Complete Path (at a branch point or end of dendrite)If you’re happy with that segment and you’ve reached either a fork or the end of that branch, click “complete path” on the same plug-in window. YAY first path done!Building on existing paths (if last path segment was completed at a fork/branching point)After completing a path, this newly-born path should show up in your Paths window:
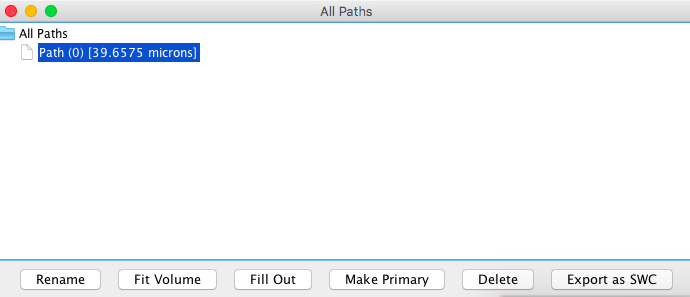 As you go along making new paths, your paths list in this window will growI opt to “complete” path segments upon reaching a branch point because it’s easier to then build on the existing branch as a completed pathway. Also, this makes it easier to pursue a pathway, and then go back to different points where there was branching.To ensure you’re connecting your different path segments right, you’d want to start the next path segment at the exact same end point you completed your last path segment (so at the exact same endpoint you labelled your branch/fork). To do this, click on the path segment you’d like to build on in your Path window (as pictured above). This will highlight the selected path in your image. Click on your image windowHolding the “alt” key on your keyboard will limit your mouse to only moving along the selected path. So you can hold your alt key and move your cursor towards your endpoint (and maybe go a bit past, just to make sure you’re actually at the end – in the picture below I went further than needed, but that doesn’t matter, my cursor should stay on the selected path as long as I hold the alt key). Clicking on your mouse at this point will start a new path right where you ended a previously-traced one:
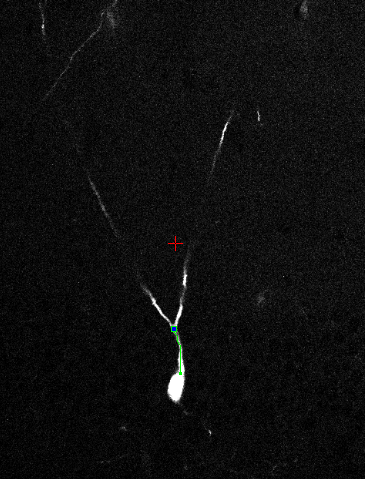 And repeat the process! If your samples have neighbouring neurons and there is a lot of overlap between them, you might want to check the 3D section below.If you notice a lot of “short” branches, these might just be cut off because of your limited number of z stack images. You might want to check the 3D section below.Actually, you might just want to check the 3D section below, even if neither of the above applies to you. Just in case there are intruding dendrites that are from neurons that are not even on your z stack – just intruding ends.Also, you might want to check the 3D section below because I talk about not tracing disconnected lines down there. (Insert more subtle hints here). Yeah, just read it.Saving and Re-openingYou can save your unfinished traces and continue at a later time. To open a previously saved trace, Open FIJI appLoad the image file, split channels, start Simple Neurite Tracer (see “Starting with FIJI” instructions above)On your plug-in window: File > Load traces
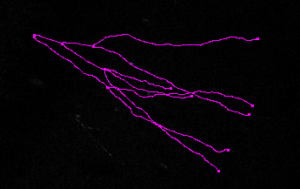
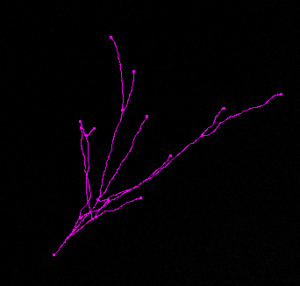
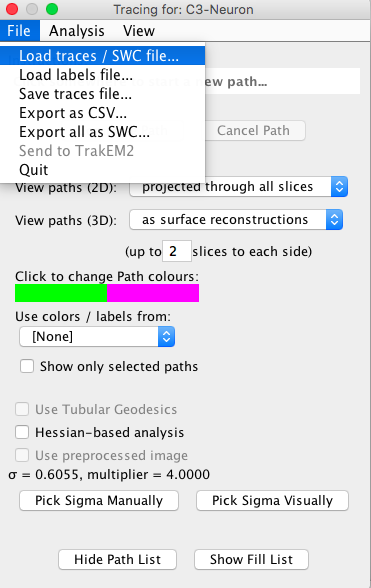 And continue tracing where you left off. Eventually you’ll get something like the image above (at the very start of the post) or like in the video below:Et Voila!
THE GREAT DEBATE – IN 3D3D viewer pro3D viewer conthe added view makes it easier to decide on connections that may seem ambiguous or unclear on 2D view. (See 3D viewer tips below) having the 3D window makes the program freeze and crash on my MacBook Air. I’ve heard that this is because the processing power on the Air is not the highest. Maybe if your computer has a higher processing power, this would not be a problem for you.Allows you to make sure that the “light” line you’re following is actually just one branch – not 2 overlapping branches
(See example video below)
3D VIEWER TIPS
Considering these pros and cons, here’s what I like to do
Check the neuron on 3D viewer first before committing to tracing.For example, you might want to check if all the branches are within your slice. From there you can decide if the neuron is still worthy of tracing.Sometimes, some branches are cut off because it was not included in this tissue slice. These could be minor branches or major branches that are cut off. In the picture below, you see a branch that would appear to be “short”, but looking at the red lines that mark the borders for the x, y, z planes, you could say they just might be cut off and included in a different slice.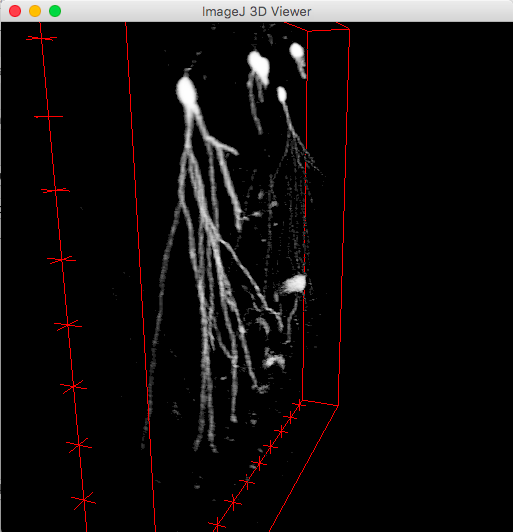 If the neurons are relatively clear (ie little overlap from neighbouring neurons), I choose to trace with no 3D view, only re-opening 3D view when I need to double check on somethingNOTE: Try to not trace in your mind. Rely on connected light paths. Sometimes when following the light (dendrites, not the spiritual metaphor), you come across sections where there is a bit of a disconnect where the light paths don’t quite meet, but it totally flows perfectly, you figure maybe something just got in the way during the picture-taking. NO, do NOT trace that. Let this be an example:
 It totally looks like it flows. It doesn’t (look at 3D view).Check branching – sometimes things can seem like 2 branches when it’s really just one, and vice versa. In this video below, you can see that from the 2D-viewing angle, it looks like the green line branches off the pink line. But when you take a peek at the 3D view and rotate the image, you see that there were actually two dendritic branches from different neurons that run parallel to each other, and at some point, branch away. And because the program merely tries to find the shortest lighted path between your two points, if it finds a path on a different plane, it will totally just jump ship to get from point A to point B.Double-check where the branching off actually happens: at the soma? Or off another branch?
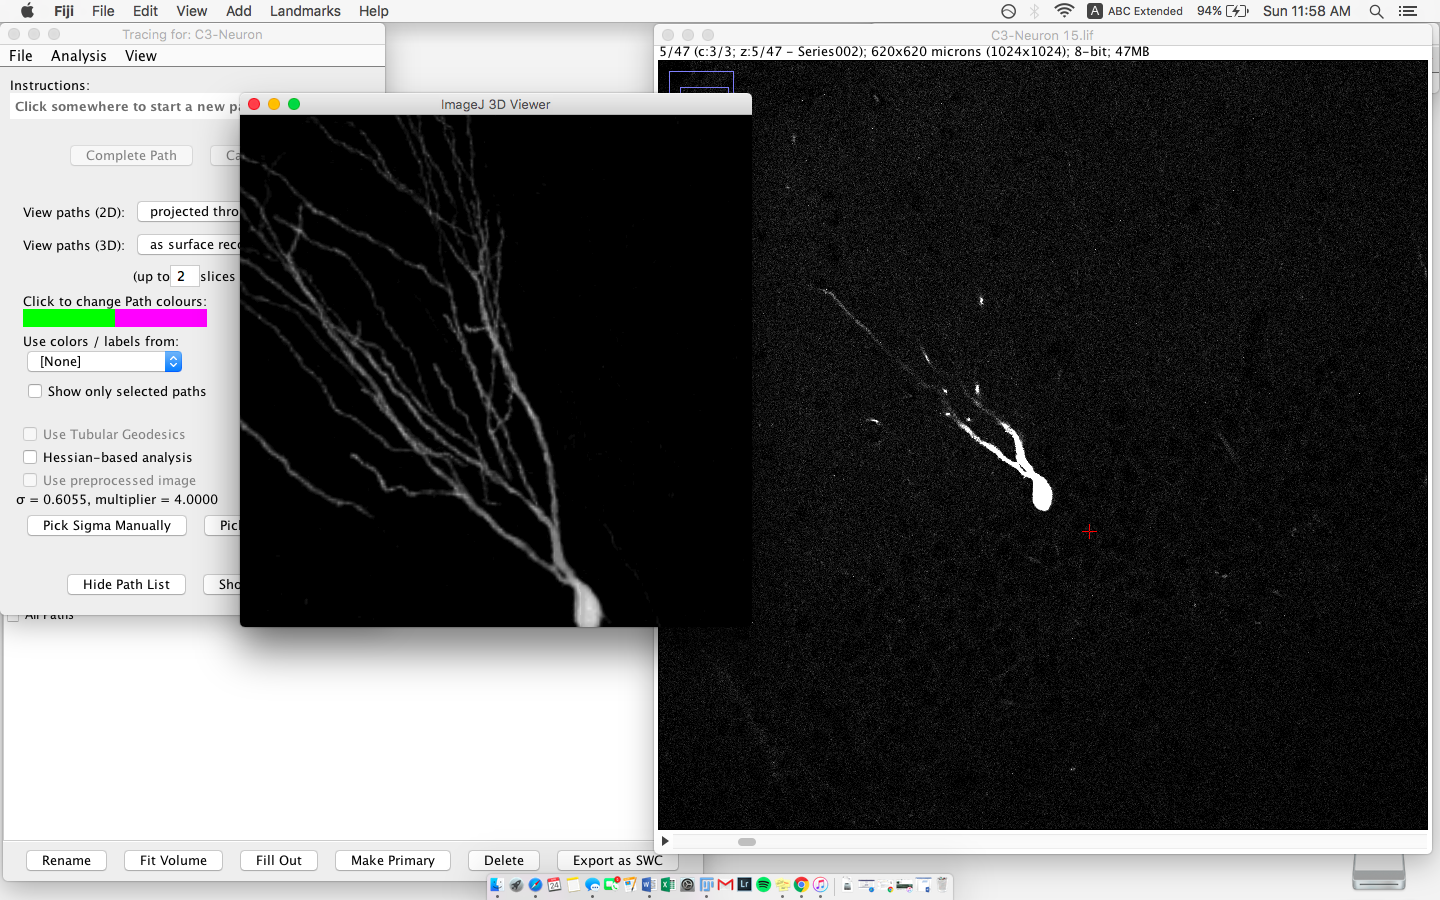 If you must have 3D view, save traces often!Note that to save traces, you click on the “File” tab on the Simple Neurite window, NOT the main FIJI app window:
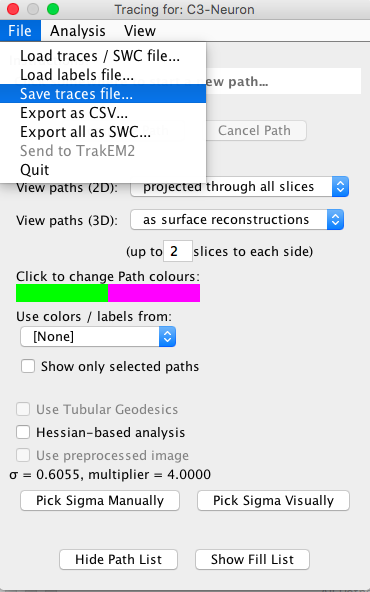 And finally, before finalizing a tracing, check the 3D viewer again. You can check:If you missed any branch, in case it was hiding behind another If there was a connected branch that you previously disregarded as belonging to another neuronIf you accidentally traced a branch that actually belongs to another neuronANALYZING THE TRACESRETRIEVING DENDRITIC LENGTH DATAHow to:
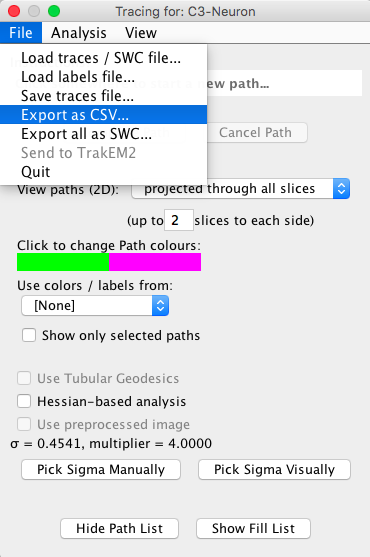 Make sure to name your file as you go.This will give you an excel file with the path length (in micrometres) of all your segments under “Path Length”
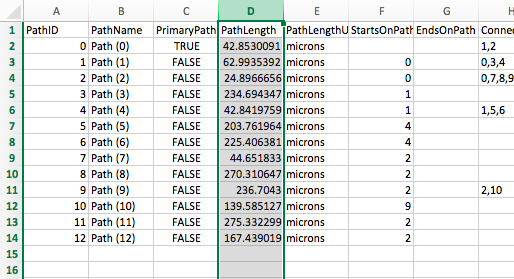 Sum up all the lengths: at the bottom of the path length column, click on an empty box and type in, “=SUM()” then click inside the parentheses, and highlight all the boxes that contain path lengths. Press Enter.
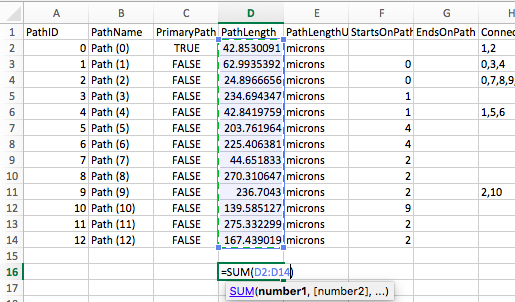 This should give you a sum of all those path lengths.And now you have length data! (See below for sample graph)
SHOLL ANALYSISLocate path originUsing the same “alt+” technique mentioned above: select the path that contains the soma start from your Path window, hold the alt key, move along the path and find the very starting point of your tracing. Alt+Shift+A : hold these keys down all together until a pop-up Sholl window appears.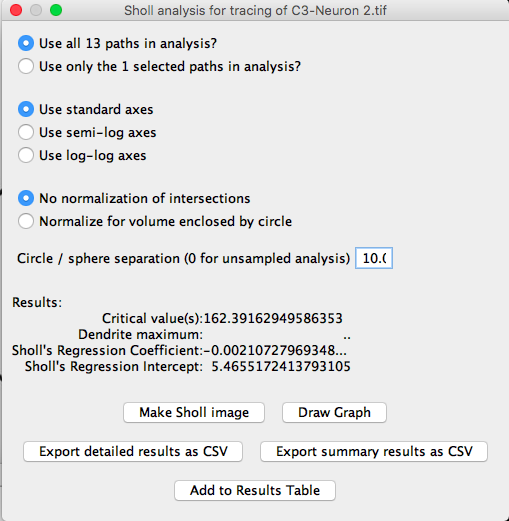 Select the “Use all x paths in analysis” instead of the “use only the 1 selected paths in analysis” – so that your whole tracing is analyzed, instead of just the one selected original path segment. TIP: For a more manageable data, you can manipulate the “circle/sphere separation” number and increase the distance between your Sholl circles. Click “Export detailed results as CSV” And now you have Sholl Analysis data! (See below for sample graph)
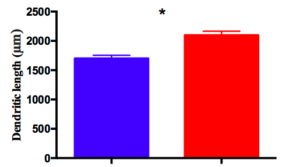
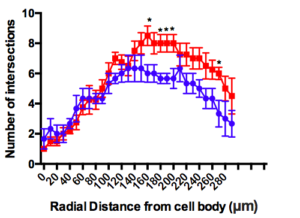
Left: sample graph comparing dendritic lengths of two groups; Right: sample graph showing Sholl Analysis; Bottom: Traced neurons
Share this:EmailFacebookTwitterReddit


